Non-destructive Mechanical


Dry Film Thickness Gauge acc. to Rossmann, Model 233 (REFERENCE CLASS)
measuring range: 0 - 1000 µm
The difference in level between substrate and film surface is gauged by the contact point of the dial indicator.
Measuring range 0-1000 µm in 5 µm divisions.
in accordance with :
ISO 2808,
ASTM D 1005,
BS 3900 : C5
Wet and Dry Film Thickness Gauge acc. to Rossmann, Model 296 (REFERENCE CLASS)
Measuring range 0 - 500 µm.
The difference in level between substrate and film surface is gauged by the contact point of the dial indicator.
Measuring range 0-500 µm in 5 µm divisions.
For measurements on wet films the contact point is raised by means of a knurled screw and then lowered until it touches the surface of the wet film.
in accordance with:
EN ISO 2808
ASTM D 1005
BS 3900 : C5

The MikroTest is supplied in 11 different models to be suitable for every requested application.
The measurement of the coating thickness is based on magnetic attraction.
- Heavy-duty zinc die-cast housing
- Magnet with long-lasting durability owing to the ElektroPhysik manufacturing process
- Measuring range up to 20 mm
- Can be used in all positions because of the weight compensation: horizontal, vertical, overhead
- Measurement also possible on curved surfaces
- Battery-free operation

Foil Thickness Gauge, Model 497
To measure the thickness of foils, cards, paper, with and without coating.
Indispensable for scrubbing resistance tests on Leneta foils and for colour and opacity measurements on contrast cards.
The foil thickness measuring instrument is used in two fields:
It may be used to measure the thickness of sheet metal, plastic foil, carton, paper, and other laminates, in a direct manner.
The second and more important application from the point of view of coating material technology is the thickness measurement of coating materials on thin base material previously referred to. If the base material is non-metallic, magnetic or electric, thickness measurement techniques cannot be employed. For nondestructive testing this instrument is the only possible method of measuring differences.
A particularly important field of application for this instrument, for which it can be considered to be essential is the measurement of "Leneta" foils for the scrubbing resistance test in accordance with the German standard DIN 53 778 Part 2 and on black and white contrast cards for colour measurement and hiding power.
(Our instruments for this: Microprocessor Controlled Film Applicator and Drying Time Recorder, Model 509 MC; ERICHSEN-Washability and Scrub Resistance Tester, Model 494; Film Applicators, Models 288, 358, 360, 411, 421; Test Cards, Model 451.)

Measuring range:1000 µm over 5 pointer revolutions
Accuracy: 1 µm
Scale 0 - 200 µm with 1 µm divisions
Readout accuracy: ± 1 µm
Depth of throat: 30 mm
Size of support face: approx. 6 mm dia., flat,
Net weight, approx.: 100 g

LITEMATIC 318
Measuring Range : 0-50.8mm
Resolution (switchable) : 0.00001mm/0.0001mm/0.001mm
Repeatability : 0.00005mm
Measuring Force : 0.01N (1gf)
Measuring speed : 2mm/s or 4mm/s High speed 8mm/s
Measuring Function : UP/Down, MAX/MIN/TIR/ZEROSET/PRESET Positioning memory switch
Parameter Function : HOLD - inch-metric - Tollerance function (3 or 5 stage tolerance judgement) - Smoothing function - Auto return function - user compensation function
Input : Foot switch
Output : SPC cable, RS-232 cable
Power Supply : AC-Adapter
Mass : 19 kg
Measurement applications
Ideal for highly repeatable and accurate measurements of easily deformable or delicate products.

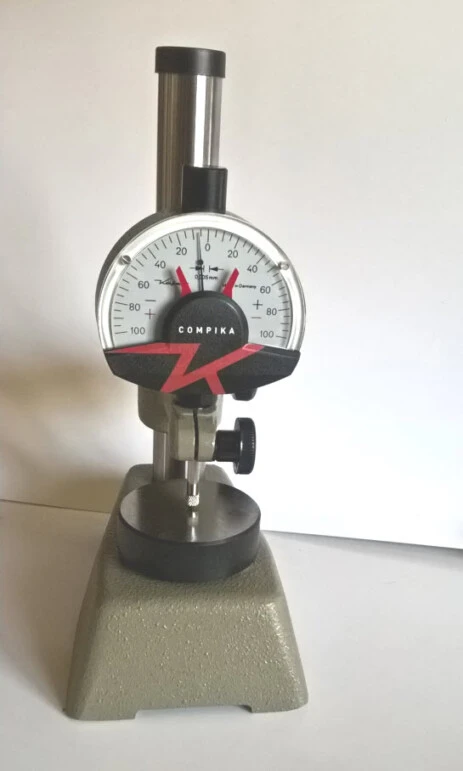
Precision Measuring Table P 7
The Precision Measuring Table P 7 is sturdily built and accurately finished. Its surface plate is hardened, ground and lapped.
It is separated from the main body resting on three support points.
The carrying arm is adjustable for height on the vertical column.
The column is hardened and ground.
Measuring capacity : 100 mm
Depth of throat : 50 mm
Column-Ø : 22 mm
Base-Ø : 50 mm
Holder opening : 8 mm H7
If desired, the Measuring Table P 7 is also available with special fittings:
Measuring Table P 7 with fluting
Measuring Table P 7 with measuring ball Ø = 30 mm
Measuring Table P 7 with measuring height of 165 mm
Measuring Table P 7 with measuring height of 215 mm
Measuring Table P 7 with measuring height of 315 mm
Measuring Table P 7 with circular support plate of Ø 80 mm
Measuring Table P 7 with circular support plate of Ø 90 mm
Measuring Table P 7 with adjustable support plate for use as base for table-thickness gauges
Delivery without Dial Gauge.


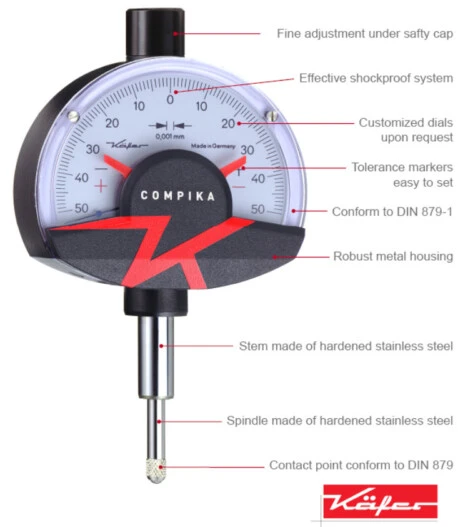
- Their design conforms to the requirements of DIN 879-1. This applies not only to the dimensions but also to permitted spans of error, hysteresis and measuring pressure. Effective shockproof system
- Pinions and shafts of the movement are jewelled
- After removal of the safety cap the adjustment screw on top of the case allows simple and safe zero setting of the instrument over the total measuring range. A safety cap prevents unintentional turning of the fine adjustment facility.
- Stem and spindle are made of hardened stainless steel.
- The measuring spindles are very sensitive on account of their accurate guides.
- Additional overtravel assists with the insertion of workpieces into the measuring device.
- The clear scale is shadow free.
- The red tolerance markers are easy to recognize and to set.
- On request all our models are available with a reduced pressure of 0.5 N.
